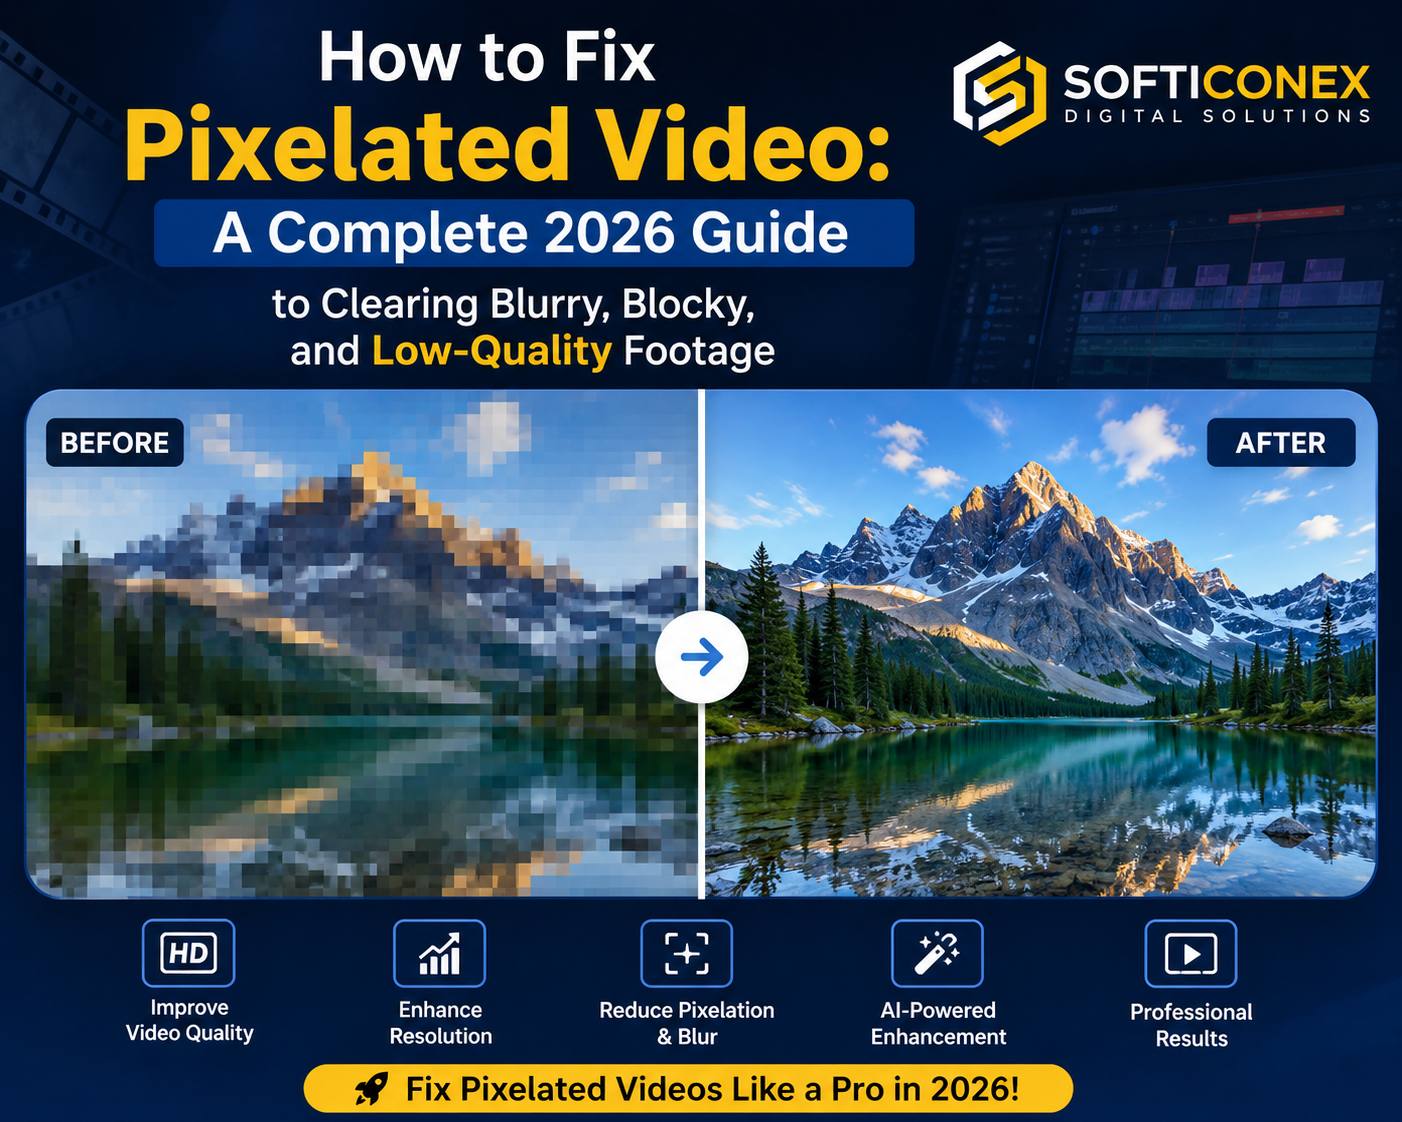
You record a video, open it on your computer, and instead of the sharp, clear footage you expected, you see a blurry mess of blocky squares. Or you download a video, and it looks fine on your phone but appears grainy and distorted on your TV. Or you upload a clear video to social media, and it comes back looking like it was filmed through frosted glass.
Pixelated video is one of the most frustrating problems in digital media. It ruins memories, makes professional content look amateurish, and leaves most people feeling powerless because they do not understand what caused it or how to reverse it.
The good news is that most pixelation problems have clear causes and practical solutions. Some can be fixed completely. Others can be improved significantly. And in every case, understanding why it happened gives you the tools to prevent it from happening again.
This guide covers every aspect of pixelated video from root causes to step-by-step fixes, tool recommendations, and prevention strategies. Whether your footage came from a smartphone, a screen recorder, a downloaded file, or a streaming platform, this guide gives you the knowledge to address it.
What Causes Video to Look Pixelated
Understanding the Root of the Problem
Pixelation in video is almost always a result of one of two things: insufficient data to represent the image accurately, or that data being stretched or distorted in ways it was never designed to handle. Once you understand which category your problem falls into, the fix becomes much clearer.
“Pixelation is not random damage. It is a predictable consequence of specific technical decisions made during recording, encoding, compression, or playback. Every pixelated video has a reason, and most reasons have a solution.”
Low Bitrate During Recording or Export
Bitrate is the amount of data used to represent each second of video. A higher bitrate means more data per second, which means more detail, smoother motion, and sharper images. A low bitrate forces the encoder to discard visual information to fit within the data limit, and those discarded details appear as blocky compression artifacts.
This is the most common cause of pixelated video. When a camera, screen recorder, or editing software exports video at too low a bitrate, the result is footage that looks acceptable on a small screen but falls apart under any scrutiny on a larger display.
Over-Compression
Every time a video file is compressed, some quality is lost. This is manageable with a single careful compression. But when a video is compressed multiple times, uploaded to a platform, downloaded, re-edited, and uploaded again, the accumulated quality loss produces significant pixelation. Each compression cycle discards more information that can never be recovered.
In real life, this is exactly what happens to many social media videos. A video recorded on a phone at decent quality gets uploaded to a messaging app that compresses it, shared to another platform that compresses it again, and by the end, it looks nothing like the original.
Upscaling Low-Resolution Source Footage
When a low-resolution video is displayed or exported at a higher resolution than its original, the player or encoder must invent pixels to fill the extra space. This process, called upscaling, produces the characteristic blocky appearance most people associate with pixelation.
A 480p video displayed full screen on a 4K monitor will look pixelated because the player is stretching 480 rows of pixel data across thousands of rows of display. No amount of processing can add back detail that was never captured in the first place.
Wrong Codec or Incompatible Format
A video codec is the algorithm used to compress and decompress video data. When a video is played back using the wrong codec, or when an incompatible codec attempts to decode the file, the result is often garbled, blocky, or distorted video. This is especially common with older file formats and proprietary codecs that are not universally supported.
Corrupted Video File
File corruption occurs when video data is damaged during recording, storage, transfer, or download. A corrupted video file can show intermittent pixelation in affected sections, freezing followed by pixelated frames, or complete distortion throughout the footage. Corruption can happen due to interrupted downloads, storage media errors, or software crashes during export.
Slow Internet or Buffering During Streaming
When streaming a video online, pixelation often indicates that the stream is running at a lower quality level than the video was originally recorded at. Streaming platforms reduce video quality automatically when available bandwidth is insufficient to maintain the original resolution. The result is temporary or persistent pixelation during playback.
Quick Reference: Causes and Primary Solutions
| Cause of Pixelation | Where It Typically Appears | Primary Fix Approach |
| Low bitrate during recording or export | Throughout the entire video | Re-export at a higher bitrate if the source is available |
| Over-compression from repeated uploads | Throughout the video, worse in motion | Export from source file, avoid re-encoding |
| Upscaled low-resolution source | Full screen on large displays | Use AI upscaling tools to improve resolution |
| Wrong or incompatible codec | Blocks, freezes, garbled sections | Convert to a universally compatible format |
| Corrupted video file | Specific sections or random frames | Use video repair software |
| Streaming, buffering, or slow connection | During online playback only | Improve the connection or manually select a higher quality |
| Wrong export settings in editing software | After editing and exporting | Re-export with corrected settings |
How to Fix Pixelated Video on Windows and Mac
Fix Pixelated Video by Re-Exporting From the Original Source
If you still have the original uncompressed or high-quality source file, this is always the best approach. Re-exporting from the original preserves all the detail that was recorded and avoids any quality loss from previous compression cycles.
- Open your source file in a video editing tool such as DaVinci Resolve, Adobe Premiere Pro, or the free option HandBrake.
- In the export or output settings, set the resolution to match your original footage: 1080p, 4K, or whatever was recorded.
- Set the bitrate to an appropriate level. For 1080p video, a bitrate of 8 to 15 Mbps produces good quality. For 4K video, aim for 35 to 60 Mbps.
- Choose a modern codec such as H.264 or H.265 for broad compatibility, or ProRes for maximum quality if file size is not a concern.
- Export the file and review the result.
“Always edit and export from the highest-quality version of your source file available. If you have the original camera file, use that. If you only have a previously compressed version, you are working with reduced information, and your results will be limited by what is in that file.”
Fix Pixelated Video Using HandBrake
HandBrake is a free, open-source video conversion tool available on Windows, Mac, and Linux. It is one of the most effective tools for re-encoding a video with corrected settings to improve perceived quality when the source is not available.
- Download and install HandBrake from handbrake.fr.
- Open your pixelated video file in HandBrake using the Open Source button.
- In the Dimensions tab, check that the resolution matches the source. Do not upscale beyond the native resolution of the file.
- In the Video tab, select H.265 as your encoder for the best quality-to-size ratio.
- Set the quality using the RF slider. An RF value between 18 and 22 produces high-quality output. Lower RF values produce larger files with better quality.
- In the Audio tab, confirm your audio settings are preserved.
- Click Start Encode and wait for the conversion to complete.
“HandBrake cannot add resolution information that was not in the original file. If your source video is 480p, re-encoding it will not make it 1080p. What HandBrake does is re-encode the existing data more efficiently, which can reduce compression artifacts and improve perceived sharpness at the source resolution.”
Fix Pixelated Video Using DaVinci Resolve
DaVinci Resolve is a professional-grade video editing and color grading tool with a free version that is more capable than most paid alternatives. It gives precise control over export settings and is ideal for correcting quality issues in video files.
- Download and install DaVinci Resolve from the official Blackmagic Design website.
- Create a new project and import your video file.
- Drag the clip to the timeline.
- Go to the Deliver page using the rocket icon at the bottom.
- In the Render Settings panel, choose Custom export and set your format to MP4 or MOV.
- Set the codec to H.264 or H.265.
- Under Video, set the resolution to match your source footage.
- Set the bitrate type to Restricted and set a target bitrate appropriate for your resolution.
- Click Add to Render Queue and then Start Render.
How to Fix Pixelated Video Using AI Upscaling
What AI Upscaling Actually Does
AI upscaling tools use machine learning models trained on millions of images and video frames to intelligently add detail when a video is enlarged beyond its original resolution. Unlike traditional upscaling, which simply stretches existing pixels, AI upscaling predicts what additional detail should look like and generates it.
The results are genuinely impressive for footage that is low resolution but otherwise well-encoded. AI upscaling can take 480p footage and produce a convincing 1080p version with sharper edges, cleaner textures, and reduced pixelation. It cannot perfectly recreate details that were never captured, but it produces results that are dramatically better than simple stretching.
Topaz Video AI
Topaz Video AI is one of the most respected AI video enhancement tools available. It offers upscaling, denoising, deinterlacing, and motion interpolation. It works on Windows and Mac and produces results that outperform most competing tools.
- Download and install Topaz Video AI from topazlabs.com.
- Import your pixelated video file.
- Select the Upscale model from the Enhancement panel. The Proteus model works well for general footage.
- Set the target resolution. For a 480p source, upscaling to 1080p is realistic. For 720p, upscaling to 4K is achievable with good results.
- Adjust the enhancement parameters. Increase the Reduce Noise and Recover Details sliders gradually.
- Preview a section of the video to evaluate the result before processing the full file.
- Export the enhanced video at your chosen resolution.
Free AI Upscaling Options
If Topaz Video AI is outside your budget, several free or lower-cost alternatives produce good results for common use cases.
- Davinci Resolve with Super Scale: DaVinci Resolve’s free version includes a Super Scale feature in the project settings that uses AI to upscale footage to higher resolutions during export. Set the Input Scaling to Super Scale 2x or 4x for a significant quality improvement.
- Enhancefox and similar online tools: Several browser-based AI video enhancers allow you to upload short video clips and download enhanced versions without installing any software. These are suitable for short clips but have file size and length limitations.
- Real-ESRGAN: This is a free, open-source AI upscaling model that can process video frames. It requires some technical comfort with command-line tools but produces excellent results and is completely free.
How to Fix a Corrupted Pixelated Video File
Identifying File Corruption
Video corruption is different from compression-related pixelation. Corruption typically appears as sudden blocks of incorrect color in specific sections, freezing followed by visual errors, or audio and video becoming out of sync alongside visual distortion. If your pixelation appears in isolated sections rather than throughout the entire video, corruption is the likely cause.
Using VLC Media Player to Repair Corrupted Video
VLC is a free media player that includes a built-in video repair function. For mildly corrupted files, VLC’s repair process can recover playable video without additional tools.
- Open VLC Media Player. If you do not have it, download it for free from videolan.org.
- Go to Preferences. On Windows, this is under Tools, on Mac under the VLC menu.
- Select Input and Codecs.
- Find the setting for the damaged or incomplete AVI file and change it to Always Fix.
- Save and close Preferences.
- Open your corrupted video file in VLC. It will attempt to repair it automatically during playback.
- Once it plays correctly, use the Convert and Save feature under Media to save a repaired copy.
Using Dedicated Video Repair Software
For more seriously corrupted files, dedicated video repair tools provide more thorough recovery options.
- Wondershare Repairit: A well-regarded paid tool that handles corrupted MP4, MOV, AVI, and other formats. It uses a reference video of the same format to help reconstruct damaged sections. Works on both Windows and Mac.
- Stellar Repair for Video: Another professional-grade option with support for a wide range of formats and a straightforward interface. Particularly effective for footage from action cameras and drones.
- Grau GmbH Video Repair Tool: A specialized tool for MP4 and MOV corruption. Effective for files that became corrupted during recording or transfer.
“Always work from a copy of your corrupted file rather than the original. Video repair tools modify the file during repair. If the repair process causes additional damage, you want your original corrupted file intact as a fallback.”
How to Fix Pixelated Video on Social Media and Streaming Platforms
Why Social Media Compresses Your Videos
Every major social media and video platform applies its own compression algorithm to uploaded videos. YouTube, Instagram, TikTok, Facebook, and X all reduce file size automatically to manage their storage and bandwidth costs. The degree of compression varies, but the result is always some quality reduction compared to the original upload.
The key is to upload the highest-quality version possible so that even after the platform’s compression, the result remains acceptable. If you upload an already-compressed video, the platform’s additional compression layer compounds the existing pixelation.
Best Export Settings for Each Major Platform
Using platform-specific export settings reduces the quality loss from platform compression because you are providing the encoder with a format it handles efficiently.
- YouTube: Export at 1080p or 4K resolution. Use H.264 codec with a bitrate of 8 Mbps for 1080p or 40 Mbps for 4K. Use a frame rate matching your source footage. YouTube re-encodes everything but handles high-bitrate H.264 input well.
- Instagram: Export at 1080 x 1080 for square video or 1080 x 1920 for Stories and Reels. Use H.264 with a bitrate of at least 3.5 Mbps. Keep the file under 650 MB for Reels.
- TikTok: Export at 1080 x 1920 at 30 or 60 fps. Use H.264 with a bitrate of at least 6 Mbps. TikTok applies aggressive compression, so uploading the highest quality possible is important.
- Facebook: Export at 1080p using H.264 at a bitrate of 8 Mbps or higher. Facebook handles H.264 input better than other codecs.
- X (formerly Twitter): Export at 1280 x 720 minimum. Use H.264 at 6.4 Mbps. X applies significant compression, so starting from high quality is essential.
Fixing Pixelated Streaming Video
If a video looks pixelated during online streaming, the cause is almost always insufficient bandwidth, causing the player to drop to a lower quality tier automatically.
- Check your internet connection speed at speedtest.net. Streaming 1080p video requires a consistent 5 Mbps minimum. 4K streaming requires 25 Mbps or more.
- On platforms like YouTube and Netflix that allow manual quality selection, click the quality settings icon and manually choose the highest available resolution rather than Auto.
- Close other applications or devices that are consuming bandwidth on the same network.
- If on Wi-Fi, move closer to the router or switch to a wired Ethernet connection.
- Clear your browser cache and cookies, as a full cache can interfere with streaming buffer performance.
- If the problem persists on a specific platform, try a different browser or the platform’s dedicated app.
How to Fix Pixelated Video on Specific Devices
Fixing Pixelated Video on iPhone and Android
Pixelation in mobile video typically comes from one of two sources: recording settings that default to lower quality to save storage, or excessive compression from messaging apps and social platforms when sharing.
On iPhone, go to Settings, then Camera, then Record Video, and make sure you are recording at 1080p or 4K at 30 fps or higher. Many users unknowingly set this to 720p and never change it.
On Android, open your camera app and check the video resolution setting in the camera settings menu. Set it to the highest available resolution. Also, check that you are not using a third-party camera app that defaults to lower quality settings.
When sharing videos, avoid sending them through messaging apps like WhatsApp or Telegram, which compress videos aggressively. Share via AirDrop, Google Drive, or a direct file transfer to preserve quality.
Fixing Pixelated Video on Windows Media Player and VLC
Sometimes a video looks pixelated because the media player is not decoding it correctly, rather than because the video itself has quality issues. Switching players often resolves this immediately.
If a video looks pixelated in Windows Media Player, open the same file in VLC. VLC supports a much wider range of codecs and handles unusual formats more gracefully. If the video looks better in VLC, the problem was with the player, not the file.
In VLC, if the video still looks soft or pixelated, go to Tools, then Preferences, then Video, and change the output module to DirectX DirectDraw video output on Windows or OpenGL video output on Mac. Some output modules handle certain video formats better than others.
Fixing Pixelated Video After Screen Recording
Screen recordings frequently appear pixelated because default screen recorder settings prioritize small file size over quality. OBS Studio, Camtasia, and Windows Game Bar all default to settings that produce acceptable but not high-quality output.
In OBS Studio, go to File, then Settings, then Output. Change the output mode to Advanced. Set the encoder to your GPU hardware encoder (NVENC for NVIDIA, AMF for AMD) or x264 for CPU encoding. Set the bitrate to 10,000 Kbps or higher for 1080p recordings. Change the rate control to CBR for consistent quality throughout the recording.
Preventing Pixelated Video Before It Happens
Record at the Highest Quality Your Device Allows
The easiest and most effective prevention strategy is to record at the highest resolution and bitrate your device and storage allow. Quality lost during recording cannot be recovered. Record at 4K if your device supports it and storage allows. Use manual camera settings when possible to ensure the bitrate does not drop in low-light or fast-motion scenarios.
Always Edit From the Original Source File
Keep your original uncompressed or high-quality recordings permanently. Never delete the source files after exporting a compressed version. If you need to re-edit or re-export the video in the future, you want to return to the original data, not a previously compressed copy. Storage is cheap. Lost source footage cannot be replaced.
Use Appropriate Bitrate Settings for Every Export
Every time you export a video, match the bitrate to the intended use and platform. Exporting at too low a bitrate saves disk space but guarantees pixelation. A simple reference guide helps: 1080p content for web delivery needs at least 8 Mbps. 4K content needs at least 35 Mbps. Talking-head footage with low motion can use the lower end of these ranges. Action footage with fast movement needs the higher end.
Avoid Unnecessary Compression Cycles
Every encode-decode cycle degrades video quality. Export once from your editing software, in the highest quality the delivery platform accepts, and upload that file directly. Do not export, then re-import, then export again. Do not convert to one format and then convert again to another. Minimize the number of times the video is processed.
Choose the Right Codec for the Right Purpose
Use H.264 for maximum compatibility across devices and platforms. Use H.265 for better quality at smaller file sizes when the audience uses modern devices. Use ProRes or DNxHD for editing masters and archive copies where quality is paramount, and file size is secondary. Choosing the wrong codec for the purpose is one of the most common sources of avoidable quality loss.
Conclusion
Pixelated video feels like permanent damage, but it is rarely beyond repair. Almost every cause of pixelation has a corresponding fix, from re-exporting with correct settings and using AI upscaling tools, to repairing corrupted files and improving streaming conditions.
The most important thing you learned from this guide is that the cause determines the cure. Pixelation from low-bitrate responses to re-encoding. Pixelation from low resolution responds to AI upscaling. Pixelation from corruption responds to repair tools. Pixelation from streaming responds to network improvements. Matching the right fix to the right cause saves you hours of trying solutions that were never going to work.
And the most powerful strategy of all is prevention. Record at the highest quality your device allows. Keep your source files. Export with appropriate bitrate settings. Minimize compression cycles. Choose the right codec for each purpose. These habits eliminate the majority of pixelation problems before they ever occur.
For the problems that do slip through, you now have a complete toolkit. Free tools like HandBrake and VLC handle the most common situations. DaVinci Resolve’s free version covers more advanced needs. And AI upscaling tools offer genuinely impressive results for footage that seemed beyond recovery.
Your videos can look the way they were meant to look. This guide is how you get there.
Frequently Asked Questions About Fixing Pixelated Video
Why does my video look pixelated after uploading to YouTube?
YouTube re-encodes all uploaded videos using its own compression algorithm. If your video looks pixelated after upload, the most common cause is uploading at too low a bitrate, which gives YouTube’s encoder less information to work with and amplifies existing compression artifacts. Re-export your video at a higher bitrate, ideally 8 Mbps or above for 1080p, and upload again. Also note that YouTube’s processing pipeline can take several hours to complete, and videos often look more pixelated during the initial processing period before the higher-quality version becomes available.
Can you fix a pixelated video without the original file?
Yes, to varying degrees. If you only have the pixelated version, AI upscaling tools like Topaz Video AI or DaVinci Resolve’s Super Scale feature can improve the apparent quality significantly by intelligently generating additional detail. The results depend on how pixelated the original is. Mild pixelation can be substantially improved. Severely pixelated low-resolution footage will improve, but cannot be restored to a level it was never recorded at.
Why does my video look pixelated on TV but fine on my phone?
Your phone has a small screen and displays the video at a size where limited resolution looks acceptable. A large TV displays the same video at a much larger size, stretching the existing pixels across more screen area and making any resolution limitations highly visible. The video has not changed. The display size has. To look good on a large TV, video needs to be recorded and exported at 1080p minimum, and ideally at 4K for screens above 55 inches.
What is the best free tool to fix pixelated video?
For re-encoding with corrected settings, HandBrake is the best free option on Windows, Mac, and Linux. For AI upscaling using free tools, DaVinci Resolve’s Super Scale feature in the free version produces strong results. For repairing corrupted video files, VLC Media Player’s built-in repair function handles mild corruption at no cost. For online options, several browser-based AI enhancers accept short clips for free, though they have upload limitations.
Does increasing video resolution fix pixelation?
Not automatically. Simply changing the resolution number in export settings without increasing the bitrate and working from a high-quality source does not fix pixelation. If you increase resolution but keep the same low bitrate, you are stretching the same limited data across more pixels, which often makes pixelation worse. To genuinely fix pixelation, you need to either re-export from a high-quality source at an appropriate bitrate or use AI upscaling tools that intelligently generate additional detail for low-resolution footage.
Why does my WhatsApp video look pixelated?
WhatsApp applies very aggressive compression to all videos sent through the app, regardless of the quality of the original. This is by design to reduce data usage and speed up delivery. The compression is applied at the sending stage and cannot be reversed by the recipient. To share a video in its original quality through WhatsApp, use the Document sharing option instead of the Video option. Selecting Share as Document sends the file without applying video compression.
What video editing tips help make videos more engaging?
Video editing tips that help make videos more engaging include adding background music, using dynamic cuts, including captions, and keeping the pacing fast and interesting.